


What follows next is my understanding of how GIT and Github works and how it helps the entire developer fraternity. I am indebted to Shubham Londhe, who is a Youtube creator, for his compelling explanations regarding GIT as a tool and Github as a way of storing and retrieving repositories remotely.
Link to Shubham's YT channel is here if you wish to go through the video by yourself.

So let's get started.
Why was there a need to come up with Git?
Let's understand this with the help of a scenario. Suppose you have written a code with a lot of hardwork and patience and your colleague wishes to make contribution to your splendid work. Unfortunately, your code gets deleted and you're left with nothing but disappointment.
Git is a tool that allows you to version control your code and/or files. Whereas GitHub is a for-profit company offering a cloud-based Git repository that helps developers store, manage, track and control changes to their code.
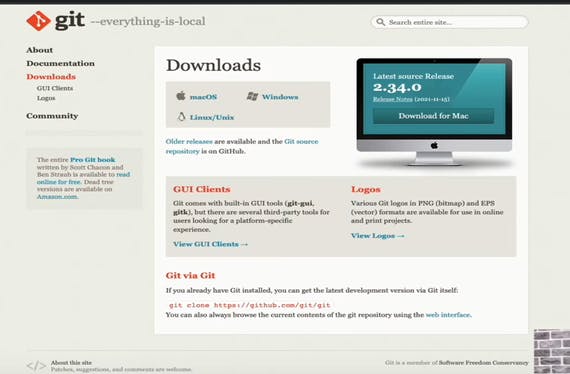
How to install git on your system? Since I have a windows machine, I’ll be able to explain how I did it on that. Firstly, go to Google and type git download. The web page will look something like the below image. Based on your machine configuration, choose the download link accordingly.
Git usually detects automatically your machine type and suggests the download link accordingly. If you have a Linux machine, git will be preinstalled in your machine. For versioning to work for you, you should initialize git in the folder or directory that you want to version. Basically, you need to tell git, “ hey git, you need to do version control for this directory or folder”. And, it will oblige without fail.
The command to initialize git: git init
After initializing, you will get to see something like below image on your terminal. I created a folder name ‘git-demo’ and opened my terminal in it. And then, ran the command, ‘git init’.
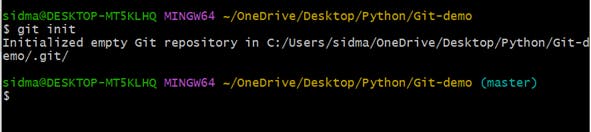
The presence of ‘. git’ folder signifies that you have successfully created your local git repository in your git-demo folder. ‘. git’ folder is a hidden folder and it is where the actual magic of git happens.
Another thing to note is, ‘git init’ command won’t affect other folders of your system. It only affects the folder where you have initialized git.
So, in a nutshell, ‘git init’ initializes an empty git repository.
Now, what after git init?
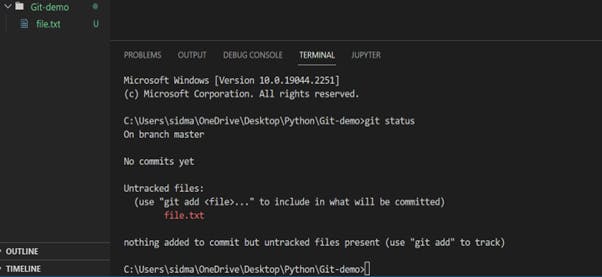
What I did is, I opened my folder, git-demo in vs code and thereafter opened my terminal in the same folder in vs code.
I ran the command git status to get the current state of my git repository. Git status command should be used in the folder where git is initialized. I’m repeating this multiple times as it is a very important thing to note.
Git status gives information regarding what branch we’re in, how many commits have we done and how many files are tracked or untracked.
Now, I can understand that you might have many questions. What is a branch? What is master? What are untracked files? What is a commit?
I’ll be answering them one by one in the coming segments of this article.
What is a branch?
Let’s understand this with Avengers analogy. Avengers is the main franchise through which many other spin-offs have come. Loki is one such spin-off that comes right off the top of my mind. Both of these movies have different timelines. When Loki was made, it had its roots and history in Avengers movie. So, Avengers becomes the main branch in our example.
Similarly for git. When we initialize a git repository, we create a main or master branch in it. Now suppose you create a file named file.py on this master repository and you don’t want to fiddle with the code that’s written on it.
If you create a new branch from this master branch, the new branch will have a copy of file.py on it too.
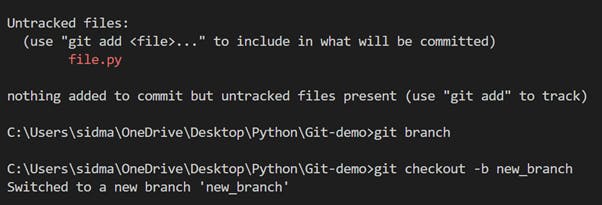
The way we create a branch is by using the command: git checkout -b
The above command creates a new branch and switches into it.
“git branch” command gives the list or information of all the branches in the git repository.
Basically, we work on a separate branch or there’s a need for a branch other than the master branch because we don’t want the main code file(s) to be affected if we make any new changes.
Lets talk about commit. What is commit?
Before we talk about, let’s first understand what’s staging in git. For us to finally save or commit the changes to our code, we need to add the untracked files to the staging area. Only then we will be able to commit these files from the staging area.
Command to add a file to staging area: git add
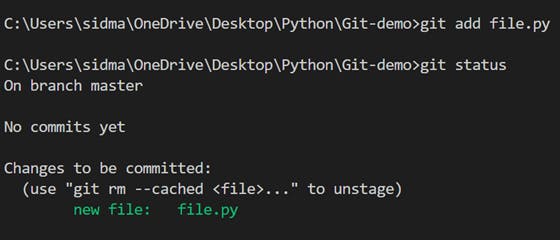
Commit is converting the untracked files to tracked files so that git can track any changes made to the files.
Command to commit a file from staging area: git commit -m “message”
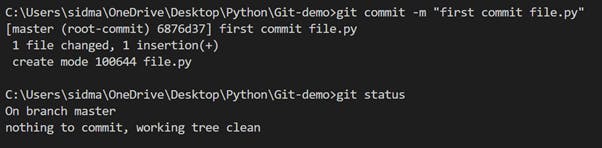
Git add and git commit are both required to change an untracked file to tracked file.
One thing to note is, even if you lose all your files fromm file systems, there’s a way to restore those files if you have committed those files on git.
Git restore
The above command will get the deleted file back to its folder in its last committed state.
What if you want to unstage a file which you didn’t want to add to be committed later?
You can use the command: git restore - -staged .
Let’s understand the working of the branches more deeply. Suppose we created a file “new.txt” in the git-demo folder being in master branch. Also, we created a branch named “dev” soon after.
The new file “new.txt” will be seen in ‘dev’ branch too as we created the dev branch after we created the file.
Now if we create another file on branch master. And we decide to switch to dev branch. The new file won’t be visible in dev branch as it belongs to master branch. Unless we merge the two branches, the files will exist in their respective branches.
This is all about git that we needed to know for now for starters.
Now let’s dive into GitHub.
GitHub:
GitHub is a for-profit company offering a cloud-based Git repository that helps developers store, manage, track and control changes to their code.
GitHub repository is an online repository where we see everything in a GUI mode. While we used execute command line on git on local machine to do all the version controlling, we achieve the same on GitHub repository using the GUI.
For example, when we click on create repository on GitHub, it is as good as git init command on our local machine.

As can be seen from the above pic, commit new file in GitHub is the same as using ‘git add’ and ‘git commit -m ’ command simultaneously.
We created a new github repository. If we want to copy the same to our local machine, we can do that by ‘git clone ’. For doing this, we do not have to initialize git on our local machine folder. Cloning is enough as when we clone, the . git file from our github repo also gets cloned. By default, the branch name on github repo is main while on local machine, its master.
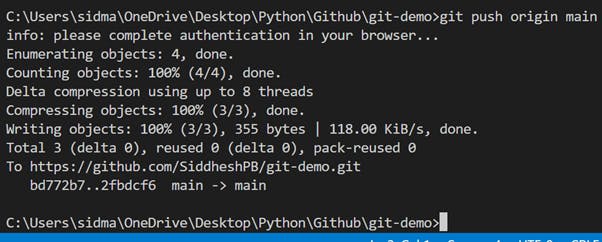
Push: All of our local commits will be published to GitHub repo.
Command: git push origin main
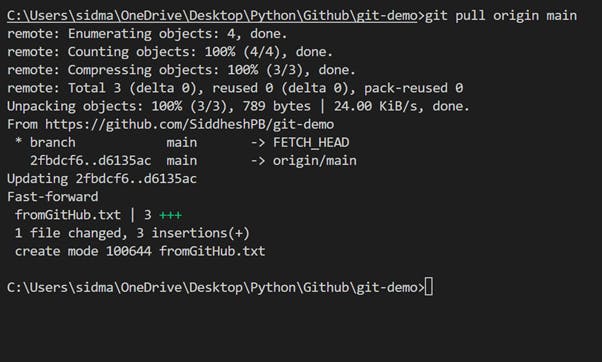
Pull: The commits from GitHub repo will be pulled to the local machine
Command: git pull origin main
That was all about Git and GitHub in this article. This is enough knowledge of version controlling for beginners as learning never stops.